Live Streaming Facebook
Thursday, June 21, 2018
Edit
Live Streaming Facebook - Facebook included Live Streams to their Facebook Pages. So if you own a page you can from now on start streaming on Facebook. (It may not be opened for everyone right now. And you might have to have a specific number of likes. I could not discover specific details about this.).
There are a few constraints though and as pointed out, you need a Facebook PAGE:
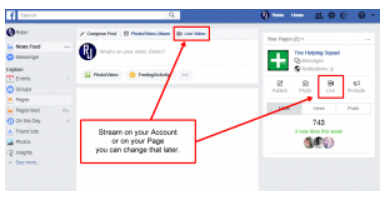
To start a stream you can click "Live Video" up leading on the Facebook page, or if you have a Page you wish to Livestream on you can click on "Live" in the right sidebar:.
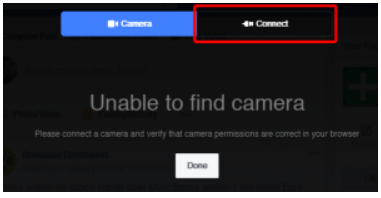
The background will turn dark and a popup will appear that might attempt to utilize your cam immediately if you have one connected to your computer system. If not you will see this image:.
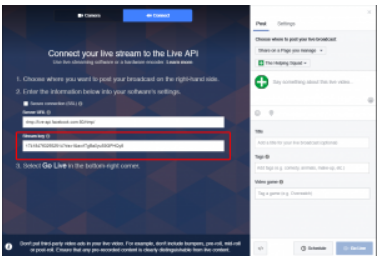
Click on "Link" as significant in red. Now we exist with the info we require for our streaming software application:.
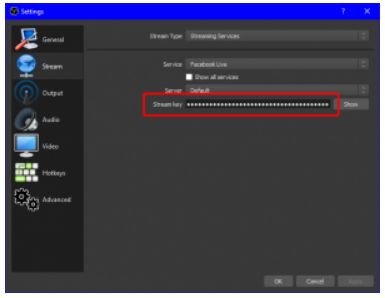
Copy the Streamkey and paste it into the Streamkey area in the settings of OBS:.
Essential: The Stream Key can just be utilized for a single Live preview/post connection. You need to utilize the same URL and key to sneak peek and post. That is, you can not preview, stop the stream, and after that resume at a later time. The URL and Key also expire 24 Hr after development.
Ensure all your settings (Audio particularly) are all set. Scenes and sources setup must be done before you start going live. If you unintentionally stop your stream you will have to produce a brand-new live video and copy over the brand-new stream key into the OBS settings. When all set, start streaming in OBS. The stream will just show up to you on the Facebook Page until you click "Go Live".
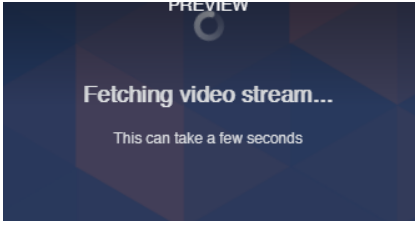
After a few seconds you ought to see the following message:.
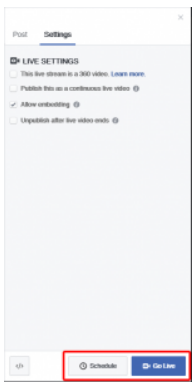
You can get in a Post message, give the Video a title, add tags as well as tag individuals prior to going live. And you can also start the Stream in your Software application and it ought to appear in the Popup Window:.

There are some more alternatives available in the settings, like allow embedding, trigger constant video or automated unpublishing after the video ended.
After you entered whatever and if your stream is online, the "Go Live" button will be blue as you can see in this example, which suggests you are now ready to go live. Click on "Go Live" to do so or click on Set up to setup a beginning time. If you go Live the Page will change to a preview of your Livestream. (See the red timer in the leading left). Make certain to silence the preview so there is no looping audio:.
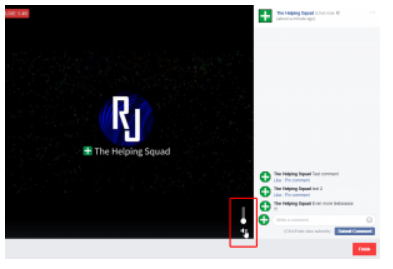
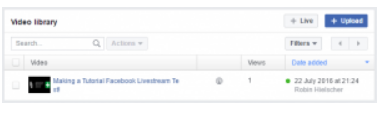
You can likewise see remarks here and obviously comment yourself. After you are done with your Stream you can click on "Finish" to stop being Live on Facebook. The video will be saved and must quickly appear in your Video Library of your Facebook Page:.
That has to do with it. You can now stream your content to Facebook and release it on your Facebook Page. Remember, the next time you start a Facebook stream you have to upgrade your Stream Secret.
Live Streaming Facebook
There are a few constraints though and as pointed out, you need a Facebook PAGE:
- Video Resolution: optimum 720p (1280 x 720) resolution, at 30 frames per second.
- Key-Frame Interval of 1 every 2 seconds.
- Max bit rate 4000Kbps.
- 240 minute optimum length except for constant streams.
To start a stream you can click "Live Video" up leading on the Facebook page, or if you have a Page you wish to Livestream on you can click on "Live" in the right sidebar:.
The background will turn dark and a popup will appear that might attempt to utilize your cam immediately if you have one connected to your computer system. If not you will see this image:.
Click on "Link" as significant in red. Now we exist with the info we require for our streaming software application:.
Copy the Streamkey and paste it into the Streamkey area in the settings of OBS:.
Essential: The Stream Key can just be utilized for a single Live preview/post connection. You need to utilize the same URL and key to sneak peek and post. That is, you can not preview, stop the stream, and after that resume at a later time. The URL and Key also expire 24 Hr after development.
Ensure all your settings (Audio particularly) are all set. Scenes and sources setup must be done before you start going live. If you unintentionally stop your stream you will have to produce a brand-new live video and copy over the brand-new stream key into the OBS settings. When all set, start streaming in OBS. The stream will just show up to you on the Facebook Page until you click "Go Live".
After a few seconds you ought to see the following message:.
You can get in a Post message, give the Video a title, add tags as well as tag individuals prior to going live. And you can also start the Stream in your Software application and it ought to appear in the Popup Window:.
There are some more alternatives available in the settings, like allow embedding, trigger constant video or automated unpublishing after the video ended.
After you entered whatever and if your stream is online, the "Go Live" button will be blue as you can see in this example, which suggests you are now ready to go live. Click on "Go Live" to do so or click on Set up to setup a beginning time. If you go Live the Page will change to a preview of your Livestream. (See the red timer in the leading left). Make certain to silence the preview so there is no looping audio:.
You can likewise see remarks here and obviously comment yourself. After you are done with your Stream you can click on "Finish" to stop being Live on Facebook. The video will be saved and must quickly appear in your Video Library of your Facebook Page:.
That has to do with it. You can now stream your content to Facebook and release it on your Facebook Page. Remember, the next time you start a Facebook stream you have to upgrade your Stream Secret.