How to Sync Facebook Contacts to Galaxy S3
Monday, June 25, 2018
Edit
In some cases when we want to switch from one Android to a new one, contacts might be the one we are care about. To include contacts to our new Android with ease, we can How To Sync Facebook Contacts To Galaxy S3 instead of including them by hand Simply follow the steps listed below.
Part 1: Sync contacts of Facebook with Android phone by hand.
When it concerns the way to sync Facebook contacts with Android, the very first option ought to by hand save the Facebook contacts in your phone. And exactly what you require is just your Android phone and an activate Wi-Fi or information connection. Then follow the actions listed below to sync contacts from Facebook to Android phone.
Action 1: Click "Account & Sync option" in Settings app.
Open "Settings" on your Android phone. Then scroll down the screen to find Account & Sync option and click it.
Action 2: Select "Facebook" alternative.
In the Account & Sync page, click the Facebook option. However, if you have actually not added your Facebook account, you can't see the Facebook choice on the list. So you require to tap on the alternative at the bottom of the screen to add it.
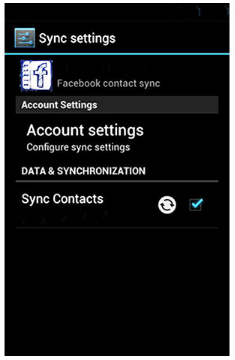
Action 3: Start Facebook contacts syncing.
Select the "Sync contacts", and after that click on "Sync Now" button to sync contacts of Facebook to Android.
After following these steps, you can transfer contacts from Facebook to Android phone, and then you can call the Facebook pals straight on Android now.
Part 2: Sync Facebook contacts using contacts app in Android
Does contacts app aid you sync Facebook contacts in Android phone? You get a clear response when you concern this part. And there really some contacts apps that able to sync Facebook contact with Android. And with help of it, the procedure of sync will become much simpler. You can quickly discover some apps draw as Sync.me, Contacts +, and other more apps. Now, in exactly what follows, there specify intros about top 3 app for Facebook contact sync.And kept reading to find the comprehensive actions of Facebook contacts sync.
Leading 1: HaxSync
As a free app, HaxSync is targeted at offering an Account Authenticator to fix problems. You are able to develop a represent each of your contacts and link them to your phone's contact. It is handy to sync Facebook contact. Next are some steps to download and set up
Action 1: Find HaxSync on Google Play and install it.
You can likewise open App Drawer to end up setup.
Action 2: Open the app and create a Haxsync account.
This tool can help you connect each contact to the one in your phone Address book.
Action 3: Transfer Facebook profile pictures, birthday info, events suggestion, etc.
You are permitted to tailor Facebook contact and calendar depending upon your preferences.

Leading 2: Sync.ME
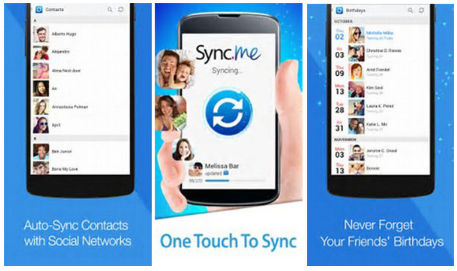
Sync.ME is a really convenient and simple tool for Facebook contact syn. Having a clear and non-ads user interface, it is attractive to users. If you are concerned about the loss of your pals' contacts, this application can considerably remove your worries. Here come its introductions.
Action 1: Install Sync.me on your Android
Download Sync.me from Google Play store and install the program on your Android. Then release the application on your Android phone
Action 2: Sync Facebook contacts to Android phone.
When you get in the Facebook contacts syncing program, tap on the "Sync button" at the bottom of the screen. And you will find three options on the middle of the screen. Select Facebook to sync by tapping the adding icon. And you also have other choices like Twitter and Google. After that, this app will sync Facebook contacts instantly to your phone.
Top 3: UberSync
If you wish to search for another easy tool to sync Facebook contact, UberSync might please your desperate requirement. The primary function of it is that it can integrate profile pictures for Facebook buddies on Android. When first utilized, it might take some time, so you had better be client.
Action 1: Open Google Play, search and download Ubersync.
Action 2: After installation, open it.
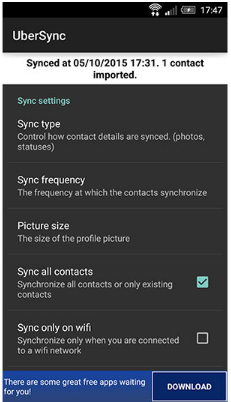
Action 3: Select a "Sync type" and make sure the "Sync frequency".
It is the first choice to sync your Facebook contact. Pick options based on your like. And you have the ability to select whether you want to sync all contacts or not.
Action 4: Pick whether you wish to run full sync.
Part 3: How to sync Android phone contacts in Facebook
Apart from syncing the Facebook contacts to your phone, you can also sync contacts from Android phone to Facebook for backup. And please read on to find more details.
Action 1: Open Facebook and log in
Open Facebook app on your Android phone and register your Facebook if you don't have an account. If you have, just log in your account.
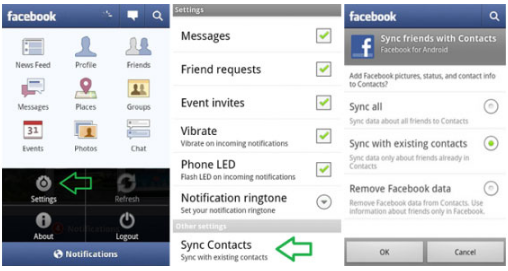
Action 2: Click on setting menu
After you have getting in Facebook, tap on the 3 bars at the ideal leading corner. This will help you to open "setting menu".
Action 3: Upload phone contacts to your Facebook account
After you open the setting menu, scroll down the list to see all choices. Then click "Constant Upload" to upload all your contacts on Android phone to your Facebook account. After that, you have successfully sync contacts to Facebook, and you will discover the profile pictures, birthday details and other details of your good friends. And if you signed up the account recently, you will see the option to "Welcome to Facebook" or you can skip this process to the next.
Action 4: Sync contacts to Facebook
Facebook will show you a list of individuals from your phone contacts. And you can welcome them just by clicking on the Invite button. Furthermore, you can click Invite All to include all your buddies in contacts. After that, tap Done icon at the ideal top corner.
Conclusion
No matter you wish to achieve Facebook contacts sync on your Android phone contacts, or sync contacts from Android to Facebook, you both can find the best solution from the post. And the very first two techniques are prepared for Facebook contacts sync to phone address book. And you can pick one according to your requirement. Therefore, hope these methods can help you. If you have more queries about the case, you can do not hesitate to share more detail about the problem in the comments.
How To Sync Facebook Contacts To Galaxy S3
Part 1: Sync contacts of Facebook with Android phone by hand.
When it concerns the way to sync Facebook contacts with Android, the very first option ought to by hand save the Facebook contacts in your phone. And exactly what you require is just your Android phone and an activate Wi-Fi or information connection. Then follow the actions listed below to sync contacts from Facebook to Android phone.
Action 1: Click "Account & Sync option" in Settings app.
Open "Settings" on your Android phone. Then scroll down the screen to find Account & Sync option and click it.
Action 2: Select "Facebook" alternative.
In the Account & Sync page, click the Facebook option. However, if you have actually not added your Facebook account, you can't see the Facebook choice on the list. So you require to tap on the alternative at the bottom of the screen to add it.
Action 3: Start Facebook contacts syncing.
Select the "Sync contacts", and after that click on "Sync Now" button to sync contacts of Facebook to Android.
After following these steps, you can transfer contacts from Facebook to Android phone, and then you can call the Facebook pals straight on Android now.
Part 2: Sync Facebook contacts using contacts app in Android
Does contacts app aid you sync Facebook contacts in Android phone? You get a clear response when you concern this part. And there really some contacts apps that able to sync Facebook contact with Android. And with help of it, the procedure of sync will become much simpler. You can quickly discover some apps draw as Sync.me, Contacts +, and other more apps. Now, in exactly what follows, there specify intros about top 3 app for Facebook contact sync.And kept reading to find the comprehensive actions of Facebook contacts sync.
Leading 1: HaxSync
As a free app, HaxSync is targeted at offering an Account Authenticator to fix problems. You are able to develop a represent each of your contacts and link them to your phone's contact. It is handy to sync Facebook contact. Next are some steps to download and set up
Action 1: Find HaxSync on Google Play and install it.
You can likewise open App Drawer to end up setup.
Action 2: Open the app and create a Haxsync account.
This tool can help you connect each contact to the one in your phone Address book.
Action 3: Transfer Facebook profile pictures, birthday info, events suggestion, etc.
You are permitted to tailor Facebook contact and calendar depending upon your preferences.
Leading 2: Sync.ME
Sync.ME is a really convenient and simple tool for Facebook contact syn. Having a clear and non-ads user interface, it is attractive to users. If you are concerned about the loss of your pals' contacts, this application can considerably remove your worries. Here come its introductions.
Action 1: Install Sync.me on your Android
Download Sync.me from Google Play store and install the program on your Android. Then release the application on your Android phone
Action 2: Sync Facebook contacts to Android phone.
When you get in the Facebook contacts syncing program, tap on the "Sync button" at the bottom of the screen. And you will find three options on the middle of the screen. Select Facebook to sync by tapping the adding icon. And you also have other choices like Twitter and Google. After that, this app will sync Facebook contacts instantly to your phone.
Top 3: UberSync
If you wish to search for another easy tool to sync Facebook contact, UberSync might please your desperate requirement. The primary function of it is that it can integrate profile pictures for Facebook buddies on Android. When first utilized, it might take some time, so you had better be client.
Action 1: Open Google Play, search and download Ubersync.
Action 2: After installation, open it.
Action 3: Select a "Sync type" and make sure the "Sync frequency".
It is the first choice to sync your Facebook contact. Pick options based on your like. And you have the ability to select whether you want to sync all contacts or not.
Action 4: Pick whether you wish to run full sync.
Part 3: How to sync Android phone contacts in Facebook
Apart from syncing the Facebook contacts to your phone, you can also sync contacts from Android phone to Facebook for backup. And please read on to find more details.
Action 1: Open Facebook and log in
Open Facebook app on your Android phone and register your Facebook if you don't have an account. If you have, just log in your account.
Action 2: Click on setting menu
After you have getting in Facebook, tap on the 3 bars at the ideal leading corner. This will help you to open "setting menu".
Action 3: Upload phone contacts to your Facebook account
After you open the setting menu, scroll down the list to see all choices. Then click "Constant Upload" to upload all your contacts on Android phone to your Facebook account. After that, you have successfully sync contacts to Facebook, and you will discover the profile pictures, birthday details and other details of your good friends. And if you signed up the account recently, you will see the option to "Welcome to Facebook" or you can skip this process to the next.
Action 4: Sync contacts to Facebook
Facebook will show you a list of individuals from your phone contacts. And you can welcome them just by clicking on the Invite button. Furthermore, you can click Invite All to include all your buddies in contacts. After that, tap Done icon at the ideal top corner.
Conclusion
No matter you wish to achieve Facebook contacts sync on your Android phone contacts, or sync contacts from Android to Facebook, you both can find the best solution from the post. And the very first two techniques are prepared for Facebook contacts sync to phone address book. And you can pick one according to your requirement. Therefore, hope these methods can help you. If you have more queries about the case, you can do not hesitate to share more detail about the problem in the comments.