How Do I Make My Facebook Timeline Private
Tuesday, June 5, 2018
Edit
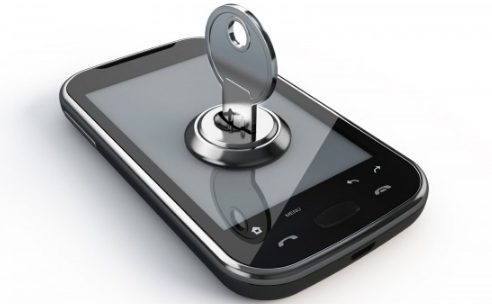
Facebook is a marvellous tool for corresponding with old good friends, family and anybody else you care to talk with. However that digital flexibility can come at a cost: your privacy. Fortunately there are methods to guarantee just the people you wish to see your Facebook profile can-- unless naturally somebody knows your password. How Do I Make My Facebook Timeline Private
The procedure of making your Facebook private is actually reasonably painless once you familiarise yourself with the increasingly puffed up user-interface. So where do you begin? Continue reading.
1. Privacy Shortcuts
There are 2 simple methods to get to the relevant personal privacy settings of your Facebook profile. In the leading right, you will see a button to the right of your name-- it has a padlock on it and 3 horizontal lines. Press it and after that choose 'See More Settings' at the bottom.

Alternatively you can click the little cog settings button located in the really top right beside the abovementioned Personal privacy Shorts button and after that choose "Settings" from the drop-down menu. Completion result is exactly the very same in either case. Now you can begin to customize your personal privacy.
2. Who can see my stuff?
Under the Personal Privacy Settings and Tools heading you will see three bolded questions: "Who can see my stuff?", "Who can call me?" and "Who can look me up?". We'll start with the very first heading in the list.
On "Who can see your future posts?" click the edit button on the far right. Now select who you wish to see your future Facebook posts from the drop-down. Public will be the reverse of private (naturally), so set it to "pals" if you just desire Facebook good friends to see them.

Alternatively you can pick "just me" if you want only yourself to see what you publish, or click "Custom". Customized allows you to choose particular options consisting of "Don't share with", implying you can pick a specific Facebook pal or good friends you no longer dream to share posts with. You can likewise block lists you belong of, such as a school network.
If there is a post you wish to limit the presence of, the "Review all your posts and things you're tagged in" setting located listed below enables you to do simply that. Hit the "activity log" button and you can then utilize the pen edit button to erase specific entries you not wish to share.
3. Who can call me?
In case you want to stop getting inbox messages from individuals you aren't Facebook friends with, you can utilize the message-filtering option under "Who can contact me?". Switch it from fundamental filtering to strict filtering to only see messages from pals in your inbox. Doing so need to keep random messages from strangers at bay.
4. Who can look me up?
In some cases you may want to limit who can look up your Facebook profile. The "Who can look me up?" options group allows you to customize your personal privacy in this regard. With friends made it possible for, just buddies can look you up utilizing your email address.
The very same options can be specified for your telephone number (if you entered one into Facebook). Again, pick the friends alternative for the strictest level of personal privacy.
Finally, you can choose whether online search engine such as Bing and Google can connect to your Timeline. A simple tick box choice is all it requires to really shut your Facebook profile off from the internet. As Facebook states, this alternative can take a while to come into effect so don't worry if it appears like you are still coming up on search engines.
5. Ultimate privacy?
To actually ensure your privacy, there is always the choice to leave Facebook completely. Naturally, this is a drastic course of action but something like online bullying might force your hand (in which case, you need to seek support). Or maybe you are just tired of sharing everything so publicly.
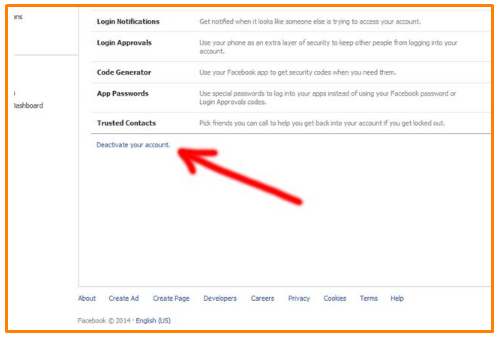
Whatever your reasoning, click the settings cog in the top right and then select Security left wing (just below General). At the bottom you will see some blue text that states "deactivate your account". Press this and you will be prompted to supply a reason for leaving in addition to a warning that your buddies will no longer have the ability to contact you. Click confirm and you are Facebook-free.
Now provide that buddy a call and choose a beverage to commemorate your new-found digital flexibility. Or simply enjoy your brand-new level of Facebook privacy.
Share How Do I Make My Facebook Timeline Private with your friends.
How Do I Make My Facebook Timeline Private
The procedure of making your Facebook private is actually reasonably painless once you familiarise yourself with the increasingly puffed up user-interface. So where do you begin? Continue reading.
1. Privacy Shortcuts
There are 2 simple methods to get to the relevant personal privacy settings of your Facebook profile. In the leading right, you will see a button to the right of your name-- it has a padlock on it and 3 horizontal lines. Press it and after that choose 'See More Settings' at the bottom.
Alternatively you can click the little cog settings button located in the really top right beside the abovementioned Personal privacy Shorts button and after that choose "Settings" from the drop-down menu. Completion result is exactly the very same in either case. Now you can begin to customize your personal privacy.
2. Who can see my stuff?
Under the Personal Privacy Settings and Tools heading you will see three bolded questions: "Who can see my stuff?", "Who can call me?" and "Who can look me up?". We'll start with the very first heading in the list.
On "Who can see your future posts?" click the edit button on the far right. Now select who you wish to see your future Facebook posts from the drop-down. Public will be the reverse of private (naturally), so set it to "pals" if you just desire Facebook good friends to see them.
Alternatively you can pick "just me" if you want only yourself to see what you publish, or click "Custom". Customized allows you to choose particular options consisting of "Don't share with", implying you can pick a specific Facebook pal or good friends you no longer dream to share posts with. You can likewise block lists you belong of, such as a school network.
If there is a post you wish to limit the presence of, the "Review all your posts and things you're tagged in" setting located listed below enables you to do simply that. Hit the "activity log" button and you can then utilize the pen edit button to erase specific entries you not wish to share.
3. Who can call me?
In case you want to stop getting inbox messages from individuals you aren't Facebook friends with, you can utilize the message-filtering option under "Who can contact me?". Switch it from fundamental filtering to strict filtering to only see messages from pals in your inbox. Doing so need to keep random messages from strangers at bay.
4. Who can look me up?
In some cases you may want to limit who can look up your Facebook profile. The "Who can look me up?" options group allows you to customize your personal privacy in this regard. With friends made it possible for, just buddies can look you up utilizing your email address.
The very same options can be specified for your telephone number (if you entered one into Facebook). Again, pick the friends alternative for the strictest level of personal privacy.
Finally, you can choose whether online search engine such as Bing and Google can connect to your Timeline. A simple tick box choice is all it requires to really shut your Facebook profile off from the internet. As Facebook states, this alternative can take a while to come into effect so don't worry if it appears like you are still coming up on search engines.
5. Ultimate privacy?
To actually ensure your privacy, there is always the choice to leave Facebook completely. Naturally, this is a drastic course of action but something like online bullying might force your hand (in which case, you need to seek support). Or maybe you are just tired of sharing everything so publicly.
Whatever your reasoning, click the settings cog in the top right and then select Security left wing (just below General). At the bottom you will see some blue text that states "deactivate your account". Press this and you will be prompted to supply a reason for leaving in addition to a warning that your buddies will no longer have the ability to contact you. Click confirm and you are Facebook-free.
Now provide that buddy a call and choose a beverage to commemorate your new-found digital flexibility. Or simply enjoy your brand-new level of Facebook privacy.
Share How Do I Make My Facebook Timeline Private with your friends.