Create A Collage for Facebook
Monday, May 21, 2018
Edit
Create A Collage For Facebook - Heather published recently about ways to utilize Statigram to create a Facebook cover collage from your Instagram photos. I thought I would share another option for those that might not be on Instagram or may desire a custom collage to use as a desktop wallpaper.
I only change my desktop wallpaper once a year (or less) and thought it was time to refurbish with some of my favorite Disney photos. The first step is to collect together the images you desire to utilize for your collage. If you utilize a program to organize your photos, then you most likely already are familiar with using it to select photos you wish to utilize and exporting them into a Folder. Because there are numerous various programs out there that do this, I won't cover those techniques here.
If you do not utilize an organizing program, no problem, you can go through your folders and choose some images by CTRL+ clicking the pictures you wish to use (holding down the CTRL secret while clicking) OR command+ clicking (if you are on Mac):.
When all your photos are chosen, press CTRL+C (command+ C on a Mac) to copy (or ideal click > copy), then ideal click and select Produce New Folder, then inside that folder CTRL+V to paste the photos in that folder (or best click > paste.
Once all of your pictures are gathered, the enjoyable starts!
Picasa is a FREE program by Google that you can download and use to create simple collages. You can see a post on The Daily Digi everything about getting began and the different features of the program.
I save all my photos on external harddrives because I have A LOT of them and cannot fit them on my maker. I also like to only use my device for conserving and running programs, this helps keep it quickly. So, after installing (which was surprisingly QUICKLY and EASY-- YAY) I picked for Picasa to only browse My Documents,
My Images, and Desktop. The factor I did this is due to the fact that 1) I utilize another program for picture organization and do not require all of my images organized in Picasa too 2) It would take way too long. This way, I would have the ability to add a folder of images simply produce a collage.
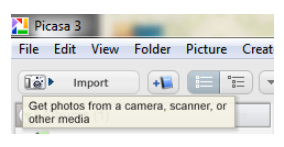
To generate the pictures I desired to utilize, I selected "Import":.
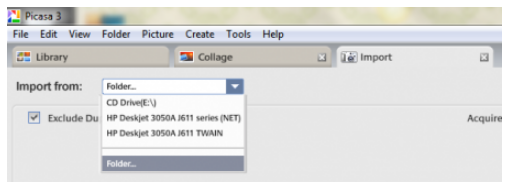
Then, selected to import from "Folder ...":.
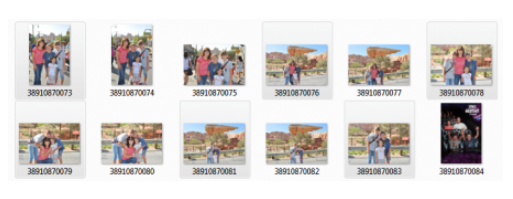
I browsed to the folder where my pictures were conserved, picked open, then picked Import All at the bottom of the window:.

This is what Picasa appeared like after it was done importing those pictures:.

In the bottom of the above window, you can see a spot to add a Folder Title, proceed and enter a name there. Then, select "Import All" with the green check mark next to it.
The folder will appear in the Library tab in the leading left corner.
Click on the Develop Collage icon. You can utilize the default settings or play with different things to see exactly what you like. If you are creating a Facebook Cover, you will wish to alter the Page Format to Customized and enter the dimensions 851 × 315. If you are producing wallpaper, you can use the [16:10] Widescreen Screen default setting in Page Format OR right click your desktop (Windows), choose Screen Resolution and see exactly what size you must make your wallpaper.
When you get whatever set the method you desire, if you are producing a wallpaper, then click the Desktop Background and it will conserve the collage to your harddrive in addition to save it as your wallpaper. If you are creating a Facebook cover, then click Export and conserve. Here's exactly what my wallpaper appeared like when I was done:.

I LOVE it! So QUICKLY and so EASY! Many magic memories caught with individuals I love, that I can delight in each day on my computer Create A Collage For Facebook!
Create A Collage For Facebook
I only change my desktop wallpaper once a year (or less) and thought it was time to refurbish with some of my favorite Disney photos. The first step is to collect together the images you desire to utilize for your collage. If you utilize a program to organize your photos, then you most likely already are familiar with using it to select photos you wish to utilize and exporting them into a Folder. Because there are numerous various programs out there that do this, I won't cover those techniques here.
If you do not utilize an organizing program, no problem, you can go through your folders and choose some images by CTRL+ clicking the pictures you wish to use (holding down the CTRL secret while clicking) OR command+ clicking (if you are on Mac):.
When all your photos are chosen, press CTRL+C (command+ C on a Mac) to copy (or ideal click > copy), then ideal click and select Produce New Folder, then inside that folder CTRL+V to paste the photos in that folder (or best click > paste.
Once all of your pictures are gathered, the enjoyable starts!
Picasa is a FREE program by Google that you can download and use to create simple collages. You can see a post on The Daily Digi everything about getting began and the different features of the program.
I save all my photos on external harddrives because I have A LOT of them and cannot fit them on my maker. I also like to only use my device for conserving and running programs, this helps keep it quickly. So, after installing (which was surprisingly QUICKLY and EASY-- YAY) I picked for Picasa to only browse My Documents,
My Images, and Desktop. The factor I did this is due to the fact that 1) I utilize another program for picture organization and do not require all of my images organized in Picasa too 2) It would take way too long. This way, I would have the ability to add a folder of images simply produce a collage.
To generate the pictures I desired to utilize, I selected "Import":.
Then, selected to import from "Folder ...":.
I browsed to the folder where my pictures were conserved, picked open, then picked Import All at the bottom of the window:.
This is what Picasa appeared like after it was done importing those pictures:.
In the bottom of the above window, you can see a spot to add a Folder Title, proceed and enter a name there. Then, select "Import All" with the green check mark next to it.
The folder will appear in the Library tab in the leading left corner.
Click on the Develop Collage icon. You can utilize the default settings or play with different things to see exactly what you like. If you are creating a Facebook Cover, you will wish to alter the Page Format to Customized and enter the dimensions 851 × 315. If you are producing wallpaper, you can use the [16:10] Widescreen Screen default setting in Page Format OR right click your desktop (Windows), choose Screen Resolution and see exactly what size you must make your wallpaper.
When you get whatever set the method you desire, if you are producing a wallpaper, then click the Desktop Background and it will conserve the collage to your harddrive in addition to save it as your wallpaper. If you are creating a Facebook cover, then click Export and conserve. Here's exactly what my wallpaper appeared like when I was done:.
I LOVE it! So QUICKLY and so EASY! Many magic memories caught with individuals I love, that I can delight in each day on my computer Create A Collage For Facebook!