When A Facebook Account is Deactivated
Saturday, March 31, 2018
Edit
Today we are here with a new Idea name When A Facebook Account Is Deactivated. This is a beneficial suggestion and I m sure that we all need it so much.
In the present world, everybody has a Totally free Facebook account. We cannot spent a day without facebook. In social sites facebook is really popular. We require to understand each and every information about it. We use it for our various types of work. So buddies! let's understand how to do it.
You can deactivate your account briefly and pick to return whenever you want.To deactivate your account you require to do some job which I am providing bellow
There are two things you can do:
1. Deactivate your account, which will protect your information however eliminate your profile from the network;
2. Delete your account, which is a permanent and comprehensive removal of your profile, information, pictures and social life, reminders for everyone's birthday, presence. It's ended up being a real crutch for people's lives, hasn't it ?!
Here's a step-by-step overview of do these:
1. To Deactivate your Facebook Account
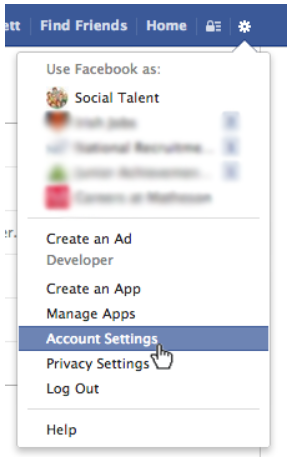
Step 1: Click on the little cog button in the really leading right corner of your screen, and click Account Settings
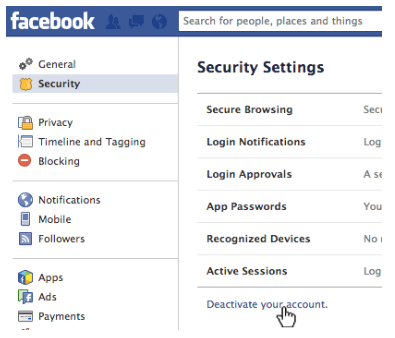
Step 2: Click Security from the left-hand panel, and at the bottom of the page click Deactivate your account.
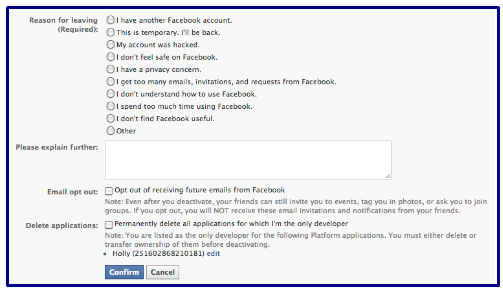
Step 3: Don't get weepy now, as Facebook will reveal you pictures of buddies who'll miss you now that you'll not be on Facebook. They will not actually, since you'll see them at work or you'll call round to their home later, connecting in this place we call reality. Complete the little questionnaire telling Facebook why you're leaving;
Step 4: Click "Verify".
If, after you've invigorated yourself from your Facebook quickly, you wish to re-activate your Facebook account once again, you can do so easy peesy. Simply log back into Facebook with your e-mail address and password, and it'll be like you never ever left. Except no doubt, in your absence, Facebook will most likely alter everything and you will not understand yourself.
2. To Permanently Erase your Facebook Account.
This is a little harder, and Facebook really do not desire to see you go. Facebook will entirely eliminate whatever you have actually added to the network, and when you do this it's entirely irretrievable. #WIN!
Facebook recommend that prior to you delete your account permanently, you download all your details. Depending on how active you are on Facebook and the length of time you have actually been a member, it could take several hours for your data to download. However, you will recieve it in one intelligible swelling soon enough.
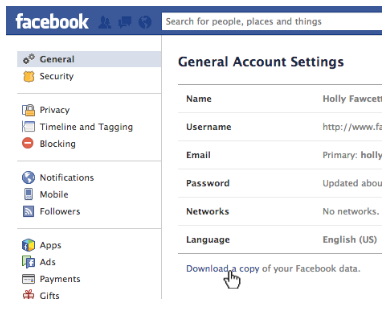
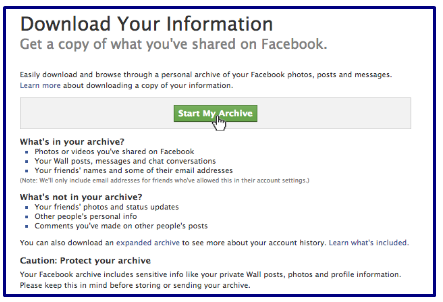
Step 1: Download all your details from Facebook, so that you have it as a backup (and semi-scrapbook of your online life). Click the cog in the leading right corner of Facebook, click Account Settings (very same as above) and click on General from the left-hand side panel. and at the bottom of the screen click Download a copy of your Facebook data, and then Start my Archive.
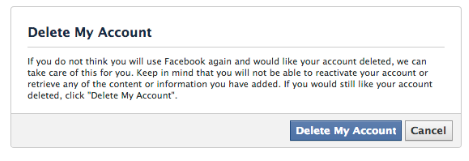
Step 2: Then, click on this link and click Erase my account. You'll be asked to input your password and also a captcha.
When A Facebook Account Is Deactivated Easy as!
Now if just I can be brave enough to do simply this.
In the present world, everybody has a Totally free Facebook account. We cannot spent a day without facebook. In social sites facebook is really popular. We require to understand each and every information about it. We use it for our various types of work. So buddies! let's understand how to do it.
You can deactivate your account briefly and pick to return whenever you want.To deactivate your account you require to do some job which I am providing bellow
When A Facebook Account Is Deactivated
There are two things you can do:
1. Deactivate your account, which will protect your information however eliminate your profile from the network;
2. Delete your account, which is a permanent and comprehensive removal of your profile, information, pictures and social life, reminders for everyone's birthday, presence. It's ended up being a real crutch for people's lives, hasn't it ?!
Here's a step-by-step overview of do these:
1. To Deactivate your Facebook Account
Step 1: Click on the little cog button in the really leading right corner of your screen, and click Account Settings
Step 2: Click Security from the left-hand panel, and at the bottom of the page click Deactivate your account.
Step 3: Don't get weepy now, as Facebook will reveal you pictures of buddies who'll miss you now that you'll not be on Facebook. They will not actually, since you'll see them at work or you'll call round to their home later, connecting in this place we call reality. Complete the little questionnaire telling Facebook why you're leaving;
Step 4: Click "Verify".
If, after you've invigorated yourself from your Facebook quickly, you wish to re-activate your Facebook account once again, you can do so easy peesy. Simply log back into Facebook with your e-mail address and password, and it'll be like you never ever left. Except no doubt, in your absence, Facebook will most likely alter everything and you will not understand yourself.
2. To Permanently Erase your Facebook Account.
This is a little harder, and Facebook really do not desire to see you go. Facebook will entirely eliminate whatever you have actually added to the network, and when you do this it's entirely irretrievable. #WIN!
Facebook recommend that prior to you delete your account permanently, you download all your details. Depending on how active you are on Facebook and the length of time you have actually been a member, it could take several hours for your data to download. However, you will recieve it in one intelligible swelling soon enough.
Step 1: Download all your details from Facebook, so that you have it as a backup (and semi-scrapbook of your online life). Click the cog in the leading right corner of Facebook, click Account Settings (very same as above) and click on General from the left-hand side panel. and at the bottom of the screen click Download a copy of your Facebook data, and then Start my Archive.
Step 2: Then, click on this link and click Erase my account. You'll be asked to input your password and also a captcha.
When A Facebook Account Is Deactivated Easy as!
Now if just I can be brave enough to do simply this.