How to Sync Facebook Contacts On android
Monday, March 12, 2018
Edit
Often when we wish to switch from one Android to a brand-new one, contacts may be the one we are appreciate. To include contacts to our brand-new Android with ease, we can How To Sync Facebook Contacts On Android instead of including them by hand Just follow the actions below.
Part 1: Sync contacts of Facebook with Android phone manually.
When it concerns the way to sync Facebook contacts with Android, the first choice should manually conserve the Facebook contacts in your phone. And what you require is only your Android phone and a trigger Wi-Fi or data connection. Then follow the steps listed below to sync contacts from Facebook to Android phone.
Action 1: Click "Account & Sync alternative" in Settings app.
Open "Settings" on your Android phone. Then scroll down the screen to find Account & Sync choice and click it.
Action 2: Pick "Facebook" option.
In the Account & Sync page, click the Facebook alternative. Nevertheless, if you have actually not added your Facebook account, you cannot see the Facebook choice on the list. So you have to tap on the choice at the bottom of the screen to include it.
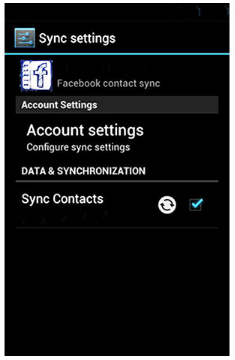
Action 3: Start Facebook contacts syncing.
Choose the "Sync contacts", and after that click "Sync Now" button to sync contacts of Facebook to Android.
After following these steps, you can move contacts from Facebook to Android phone, and after that you can call the Facebook friends directly on Android now.
Part 2: Sync Facebook contacts using contacts app in Android
Does contacts app help you sync Facebook contacts in Android phone? You get a clear response when you pertain to this part. And there actually some contacts apps that able to sync Facebook contact with Android. And with assistance of it, the process of sync will become much simpler. You can quickly find some apps suck as Sync.me, Contacts +, and other more apps. Now, in exactly what follows, there are particular introductions about leading 3 app for Facebook contact sync.And continued reading to find the comprehensive steps of Facebook contacts sync.
Top 1: HaxSync
As a totally free app, HaxSync is targeted at using an Account Authenticator to fix problems. You are able to produce a represent each of your contacts and link them to your phone's contact. It is helpful to sync Facebook contact. Next are some steps to download and install
Action 1: Find HaxSync on Google Play and install it.
You can likewise open App Drawer to end up installation.
Action 2: Open the app and produce a Haxsync account.
This tool can help you link each contact to the one in your phone Address book.
Action 3: Transfer Facebook profile pictures, birthday info, occasions tip, and so on.
You are enabled to personalize Facebook contact and calendar depending on your choices.

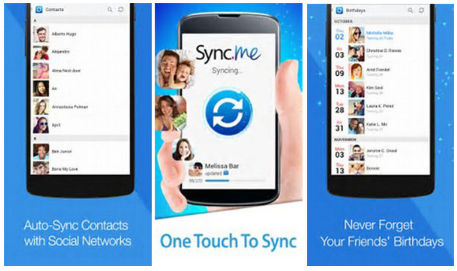
Top 2: Sync.ME
Sync.ME is a very practical and easy tool for Facebook contact syn. Having a clear and non-ads user interface, it is appealing to users. If you are concerned about the loss of your buddies' contacts, this application can significantly remove your worries. Here come its introductions.
Action 1: Set Up Sync.me on your Android
Download Sync.me from Google Play shop and install the program on your Android. Then launch the application on your Android phone
Action 2: Sync Facebook contacts to Android phone.
When you enter the Facebook contacts syncing program, tap on the "Sync button" at the bottom of the screen. And you will find 3 alternatives on the middle of the screen. Select Facebook to sync by tapping the including icon. And you likewise have other choices like Twitter and Google. After that, this app will sync Facebook contacts immediately to your phone.
Leading 3: UberSync
If you want to look for another easy tool to sync Facebook contact, UberSync might satisfy your desperate need. The primary function of it is that it can integrate profile pictures for Facebook good friends on Android. When first used, it might take some time, so you had much better be client.
Action 1: Open Google Play, search and download Ubersync.
Action 2: After installation, open it.
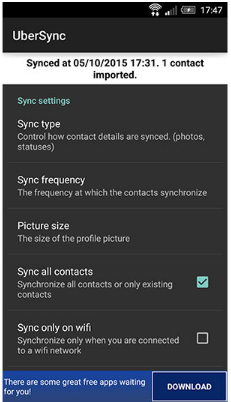
Action 3: Select a "Sync type" and guarantee the "Sync frequency".
It is the first choice to sync your Facebook contact. Select alternatives based on your like. And you have the ability to pick whether you wish to sync all contacts or not.
Action 4: Pick whether you want to run full sync.
Part 3: The best ways to sync Android phone contacts in Facebook
Apart from syncing the Facebook contacts to your phone, you can likewise sync contacts from Android phone to Facebook for backup. And please continued reading to find more details.
Action 1: Open Facebook and log in
Open Facebook app on your Android phone and register your Facebook if you don't have an account. If you have, just log in your account.
Action 2: Click on setting menu
After you have going into Facebook, tap on the three bars at the ideal top corner. This will help you to open "setting menu".
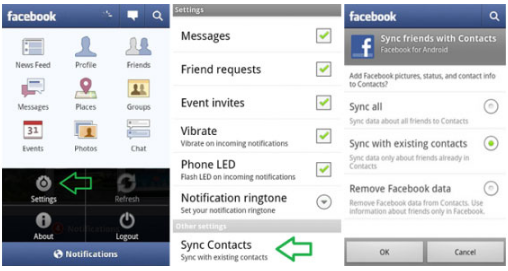
Action 3: Upload phone contacts to your Facebook account
After you open the setting menu, scroll down the list to see all alternatives. Then click "Constant Upload" to publish all your contacts on Android phone to your Facebook account. After that, you have successfully sync contacts to Facebook, and you will find the profile photos, birthday info and other details of your good friends. And if you signed up the account recently, you will see the alternative to "Invite to Facebook" or you can avoid this process to the next.
Action 4: Sync contacts to Facebook
Facebook will reveal you a list of people from your phone contacts. And you can welcome them simply by clicking the Invite button. In addition, you can click on Invite All to add all your pals in contacts. After that, tap Done icon at the best top corner.
Conclusion
No matter you wish to attain Facebook contacts sync on your Android phone contacts, or sync contacts from Android to Facebook, you both can discover the best solution from the post. And the first two approaches are gotten ready for Facebook contacts sync to phone address book. And you can choose one according to your requirement. Hence, hope these approaches can help you. If you have more queries about the case, you can do not hesitate to share more detail about the issue in the remarks.
How To Sync Facebook Contacts On Android
Part 1: Sync contacts of Facebook with Android phone manually.
When it concerns the way to sync Facebook contacts with Android, the first choice should manually conserve the Facebook contacts in your phone. And what you require is only your Android phone and a trigger Wi-Fi or data connection. Then follow the steps listed below to sync contacts from Facebook to Android phone.
Action 1: Click "Account & Sync alternative" in Settings app.
Open "Settings" on your Android phone. Then scroll down the screen to find Account & Sync choice and click it.
Action 2: Pick "Facebook" option.
In the Account & Sync page, click the Facebook alternative. Nevertheless, if you have actually not added your Facebook account, you cannot see the Facebook choice on the list. So you have to tap on the choice at the bottom of the screen to include it.
Action 3: Start Facebook contacts syncing.
Choose the "Sync contacts", and after that click "Sync Now" button to sync contacts of Facebook to Android.
After following these steps, you can move contacts from Facebook to Android phone, and after that you can call the Facebook friends directly on Android now.
Part 2: Sync Facebook contacts using contacts app in Android
Does contacts app help you sync Facebook contacts in Android phone? You get a clear response when you pertain to this part. And there actually some contacts apps that able to sync Facebook contact with Android. And with assistance of it, the process of sync will become much simpler. You can quickly find some apps suck as Sync.me, Contacts +, and other more apps. Now, in exactly what follows, there are particular introductions about leading 3 app for Facebook contact sync.And continued reading to find the comprehensive steps of Facebook contacts sync.
Top 1: HaxSync
As a totally free app, HaxSync is targeted at using an Account Authenticator to fix problems. You are able to produce a represent each of your contacts and link them to your phone's contact. It is helpful to sync Facebook contact. Next are some steps to download and install
Action 1: Find HaxSync on Google Play and install it.
You can likewise open App Drawer to end up installation.
Action 2: Open the app and produce a Haxsync account.
This tool can help you link each contact to the one in your phone Address book.
Action 3: Transfer Facebook profile pictures, birthday info, occasions tip, and so on.
You are enabled to personalize Facebook contact and calendar depending on your choices.
Top 2: Sync.ME
Sync.ME is a very practical and easy tool for Facebook contact syn. Having a clear and non-ads user interface, it is appealing to users. If you are concerned about the loss of your buddies' contacts, this application can significantly remove your worries. Here come its introductions.
Action 1: Set Up Sync.me on your Android
Download Sync.me from Google Play shop and install the program on your Android. Then launch the application on your Android phone
Action 2: Sync Facebook contacts to Android phone.
When you enter the Facebook contacts syncing program, tap on the "Sync button" at the bottom of the screen. And you will find 3 alternatives on the middle of the screen. Select Facebook to sync by tapping the including icon. And you likewise have other choices like Twitter and Google. After that, this app will sync Facebook contacts immediately to your phone.
Leading 3: UberSync
If you want to look for another easy tool to sync Facebook contact, UberSync might satisfy your desperate need. The primary function of it is that it can integrate profile pictures for Facebook good friends on Android. When first used, it might take some time, so you had much better be client.
Action 1: Open Google Play, search and download Ubersync.
Action 2: After installation, open it.
Action 3: Select a "Sync type" and guarantee the "Sync frequency".
It is the first choice to sync your Facebook contact. Select alternatives based on your like. And you have the ability to pick whether you wish to sync all contacts or not.
Action 4: Pick whether you want to run full sync.
Part 3: The best ways to sync Android phone contacts in Facebook
Apart from syncing the Facebook contacts to your phone, you can likewise sync contacts from Android phone to Facebook for backup. And please continued reading to find more details.
Action 1: Open Facebook and log in
Open Facebook app on your Android phone and register your Facebook if you don't have an account. If you have, just log in your account.
Action 2: Click on setting menu
After you have going into Facebook, tap on the three bars at the ideal top corner. This will help you to open "setting menu".
Action 3: Upload phone contacts to your Facebook account
After you open the setting menu, scroll down the list to see all alternatives. Then click "Constant Upload" to publish all your contacts on Android phone to your Facebook account. After that, you have successfully sync contacts to Facebook, and you will find the profile photos, birthday info and other details of your good friends. And if you signed up the account recently, you will see the alternative to "Invite to Facebook" or you can avoid this process to the next.
Action 4: Sync contacts to Facebook
Facebook will reveal you a list of people from your phone contacts. And you can welcome them simply by clicking the Invite button. In addition, you can click on Invite All to add all your pals in contacts. After that, tap Done icon at the best top corner.
Conclusion
No matter you wish to attain Facebook contacts sync on your Android phone contacts, or sync contacts from Android to Facebook, you both can discover the best solution from the post. And the first two approaches are gotten ready for Facebook contacts sync to phone address book. And you can choose one according to your requirement. Hence, hope these approaches can help you. If you have more queries about the case, you can do not hesitate to share more detail about the issue in the remarks.